
From Book to Booth: Lessons From My First Markets
Welcome to my first blog post of 2026! This year, I’m planning a series of blog posts to share the process of creating and publishing children’s picture books. In these posts, I’ll link readers to helpful resources and tools and share lessons that I’ve learned along the way. Questions or topic suggestions are always welcome :)
For my first post, I’m starting close to the ‘end’ of the publishing journey, with a look at my first live book-selling events. While they’re somewhat fresh in my mind, I’ll recap my experiences preparing for and hosting vendor booths at a holiday market in Sunnyside, Queens, and a local makers event at my friend Emilie Shapiro’s jewelry studio.
Read on to dive into the following:
Finding and applying to book fairs/markets
Booth set-up and supplies
Pricing and pitching your books
Best practices
Packing list

Finding and applying to book fairs/markets
I lucked out on learning about these events through friends and word of mouth, but subsequently started a more systematic search for children’s book-specific fairs.
For this, I used ChatGPT and general searching to help identify “local children’s book fairs near [my location]”. I compiled the results into a spreadsheet with the event title, location, dates, registration information (including cost, deadlines, and author requirements), and links to the event website and social media accounts. I also started following relevant accounts on Instagram, which has helped me keep up with registration openings, etc. Mark your calendars and planners in advance to block out key dates.
The children’s book fairs I’m tracking this year are the Brooklyn Book Festival, Brooklyn Children’s Book Fair, Chappaqua Children’s Book Festival, Gold Coast Book Fair, Hudson Children’s Book Festival, and the Westchester Children’s Book Festival for Young Readers.
Booth set-up and supplies
Start with the basics. What size vendor space do you have available? Will you need to bring your own canopy tent and/or table, or will the event provide these for you? From there, list out the must-haves that you’ll need to bring. These likely include basic setup materials (tent, table, chairs), your inventory, display tools, booth signage (from banners to price lists), and decor or booth draws to entice people to visit you! We'll dive into some of these in more detail below…
Booth signage:
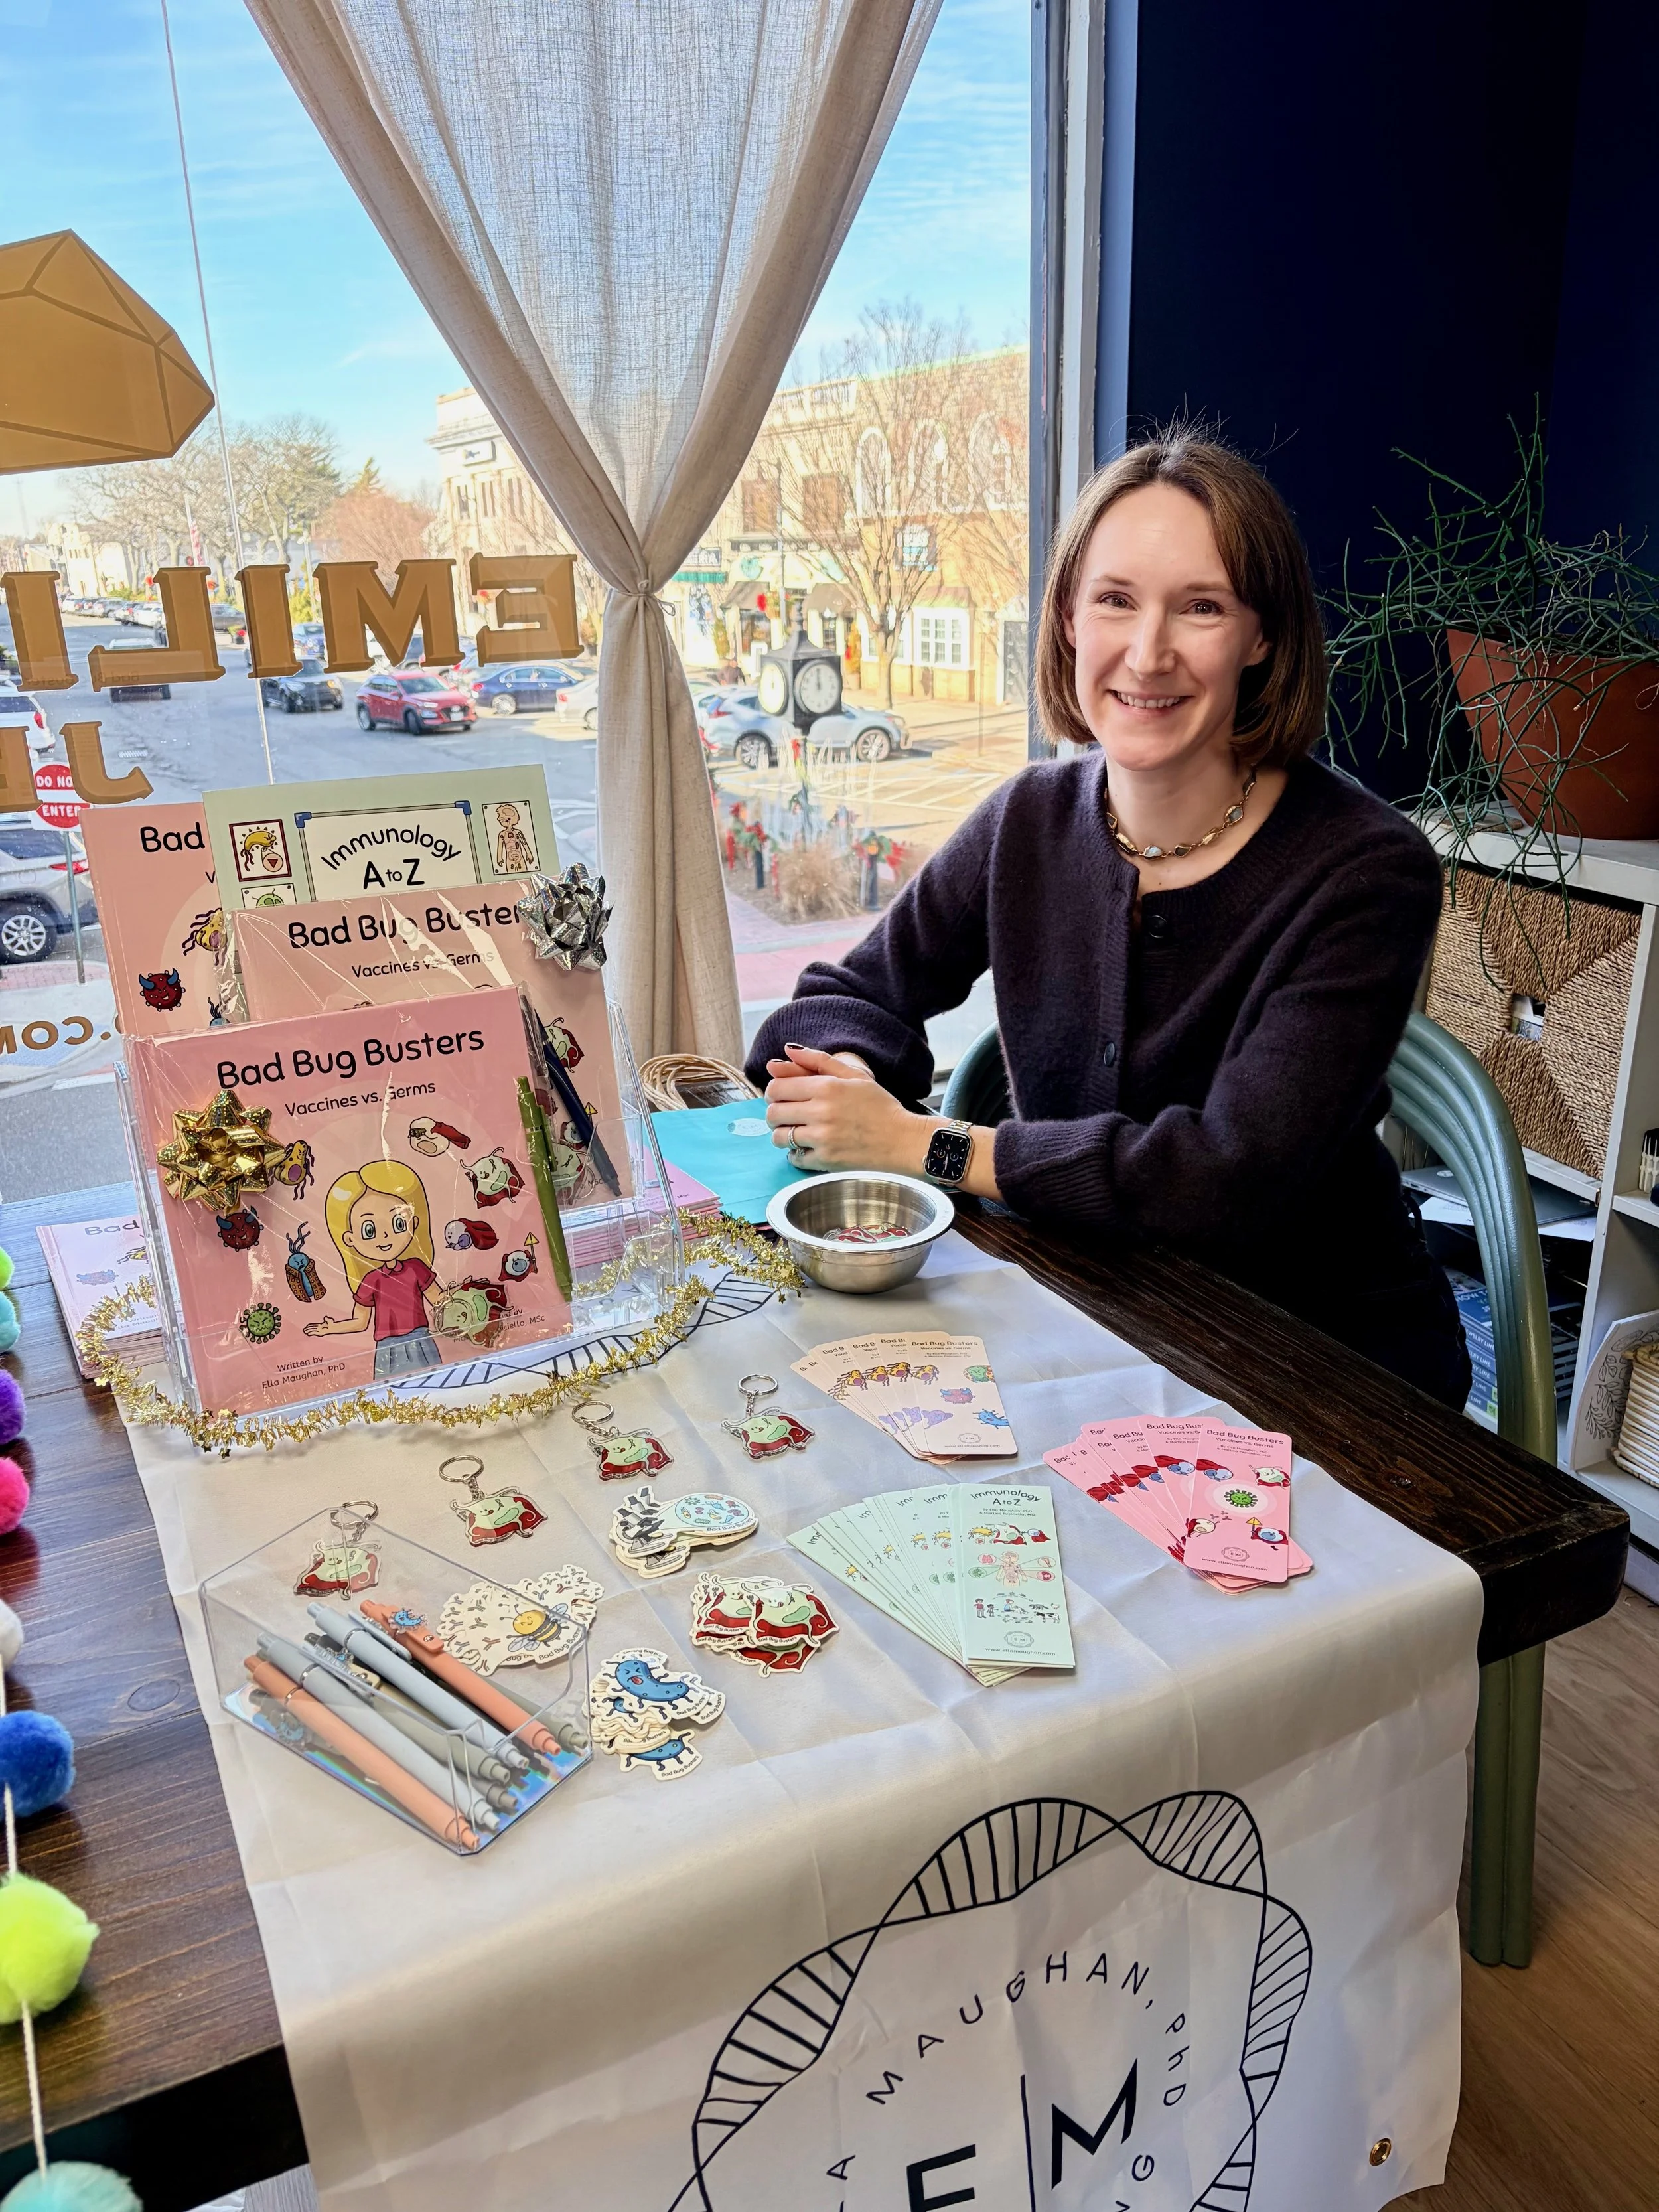
“Bigger” signage you might consider investing in includes banners that span the top of your canopy tent, hang across the back of the tent, or cover the table. There are many options for purchasing personalized banners that clearly convey your branding (e.g., name and logo) or your products (what you’re selling). These should be clearly visible from afar, so keep font size and legibility in mind when designing them. Pull-up banners are another option to showcase your products if you have the space. I wasn’t ready to invest in big signage yet, but I created a table runner with my brand logo/name as a start.
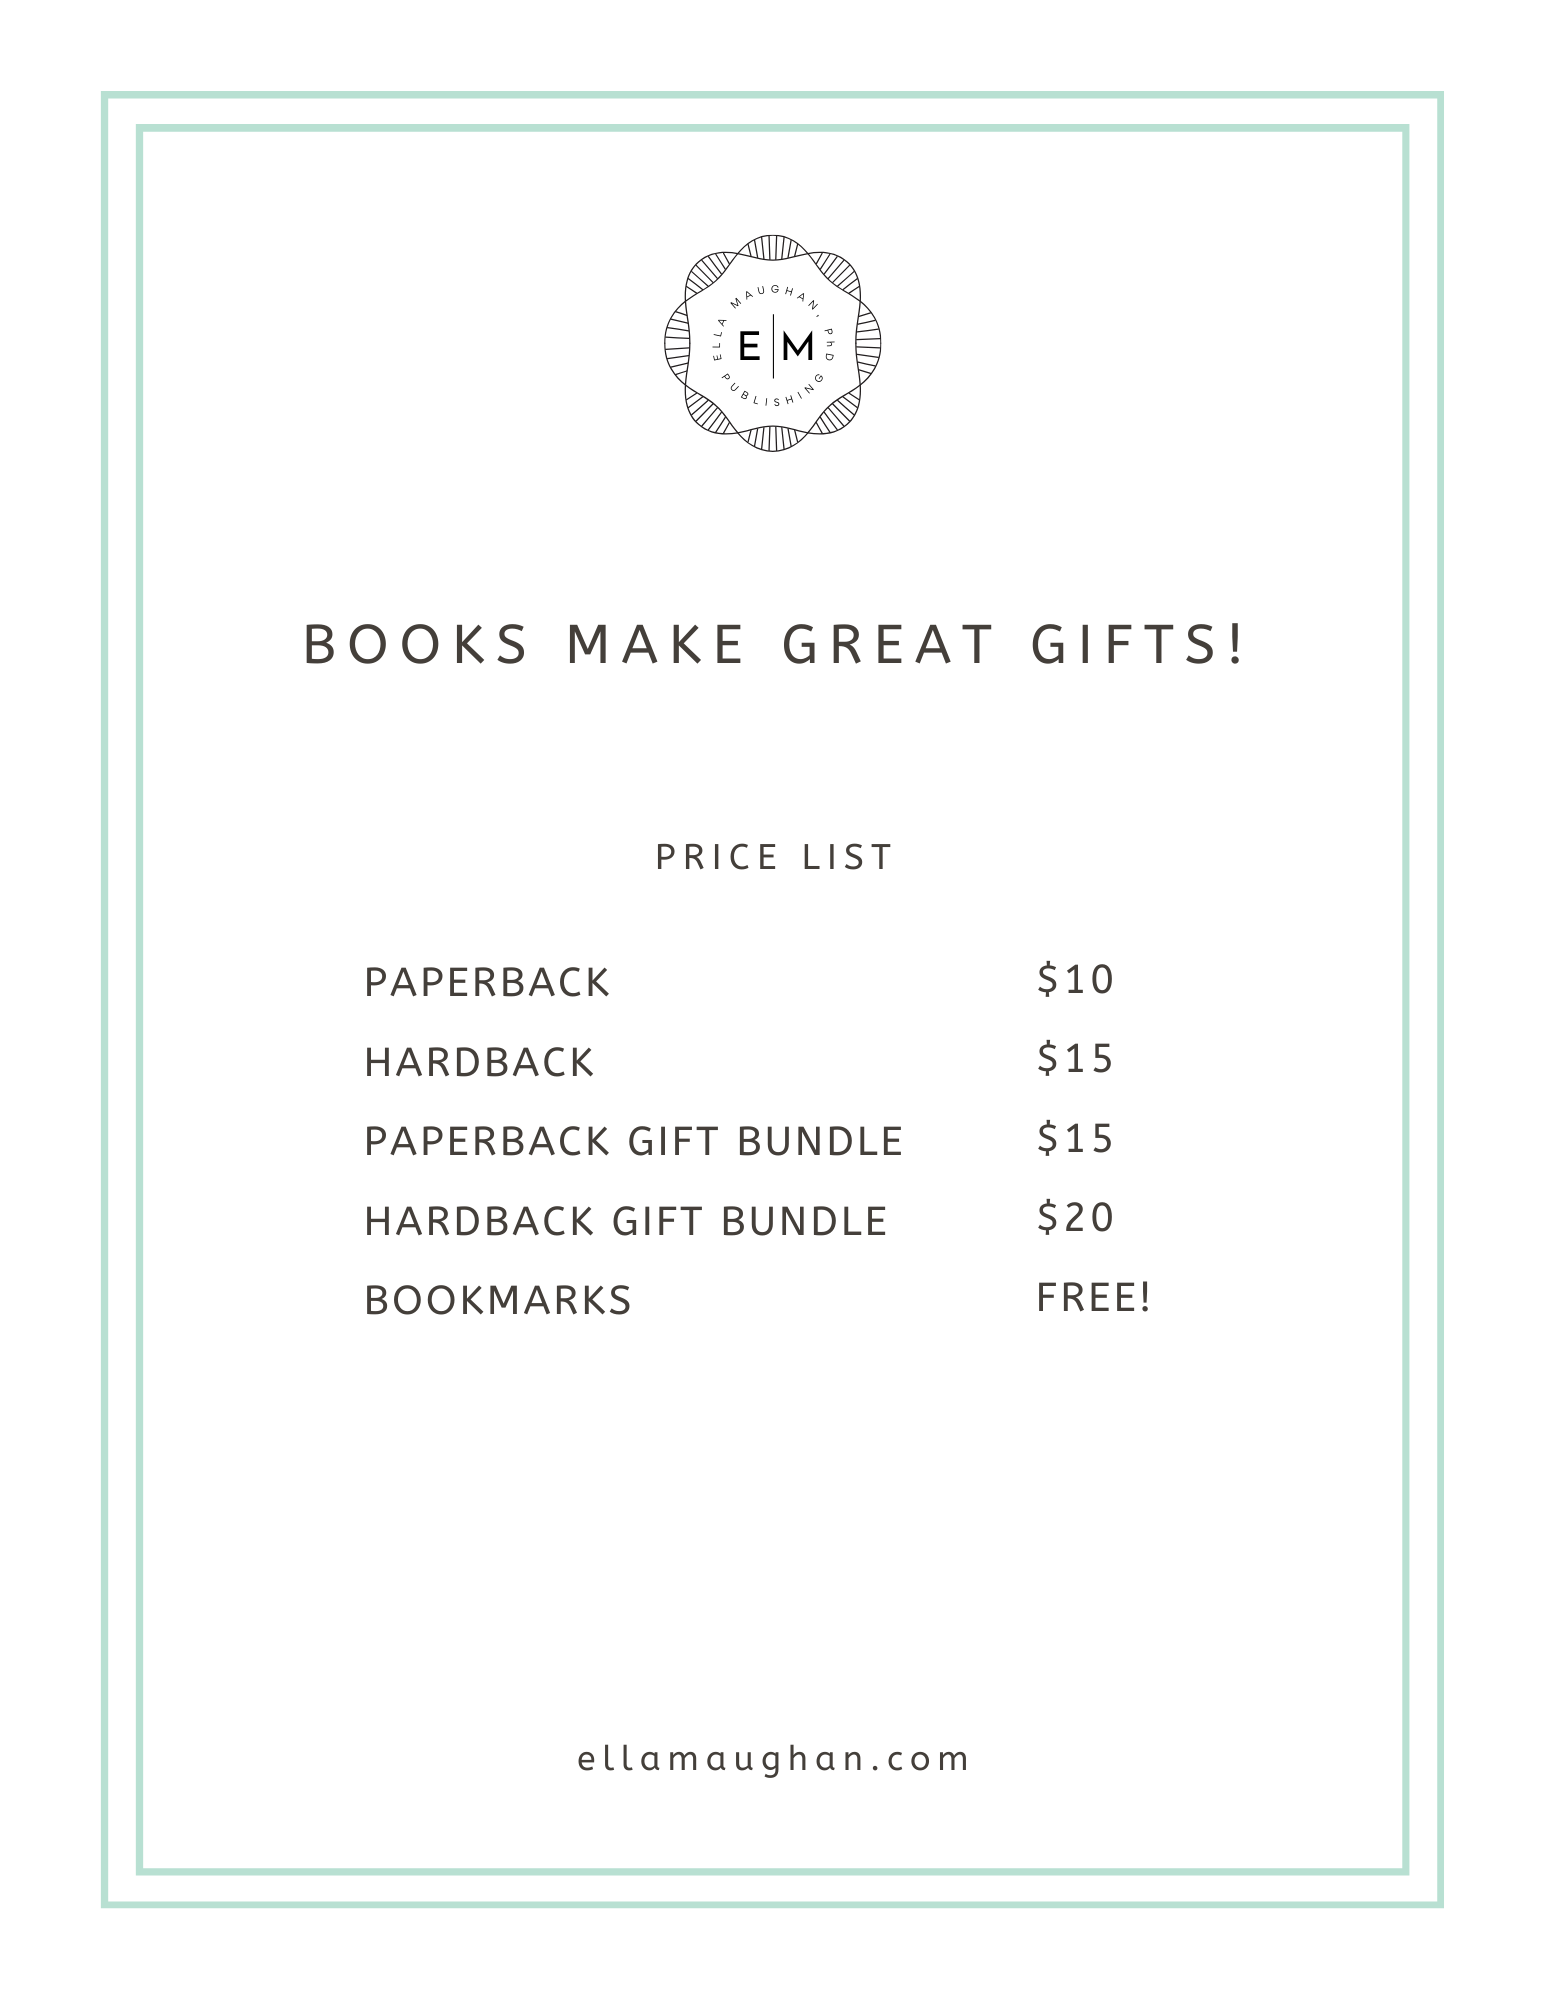
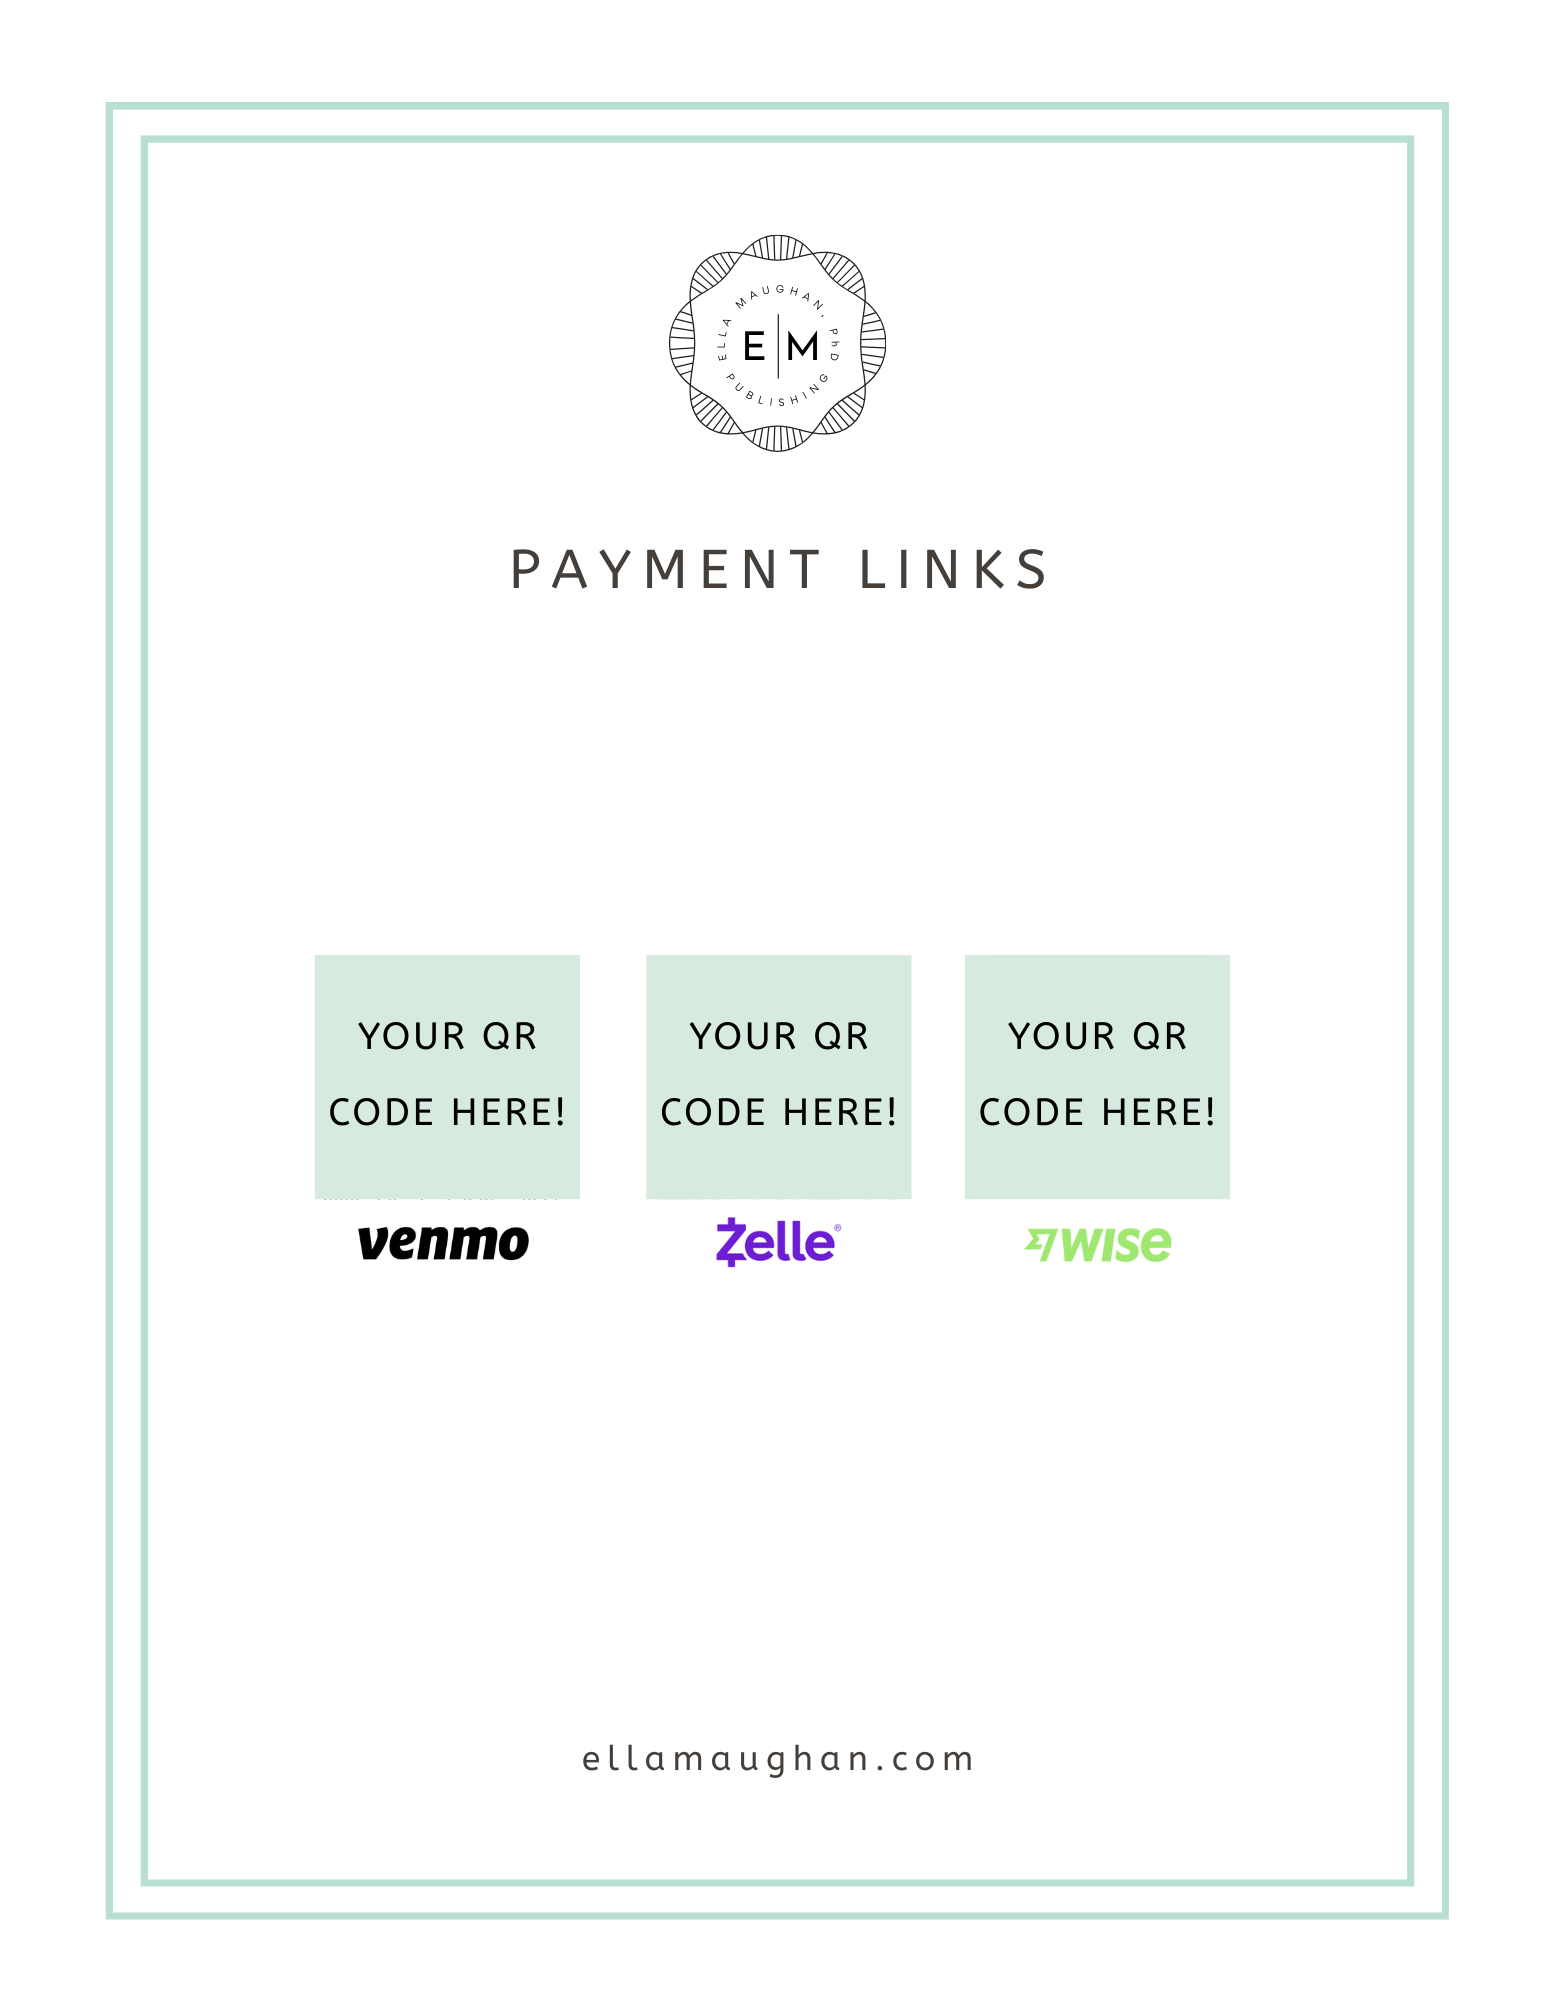
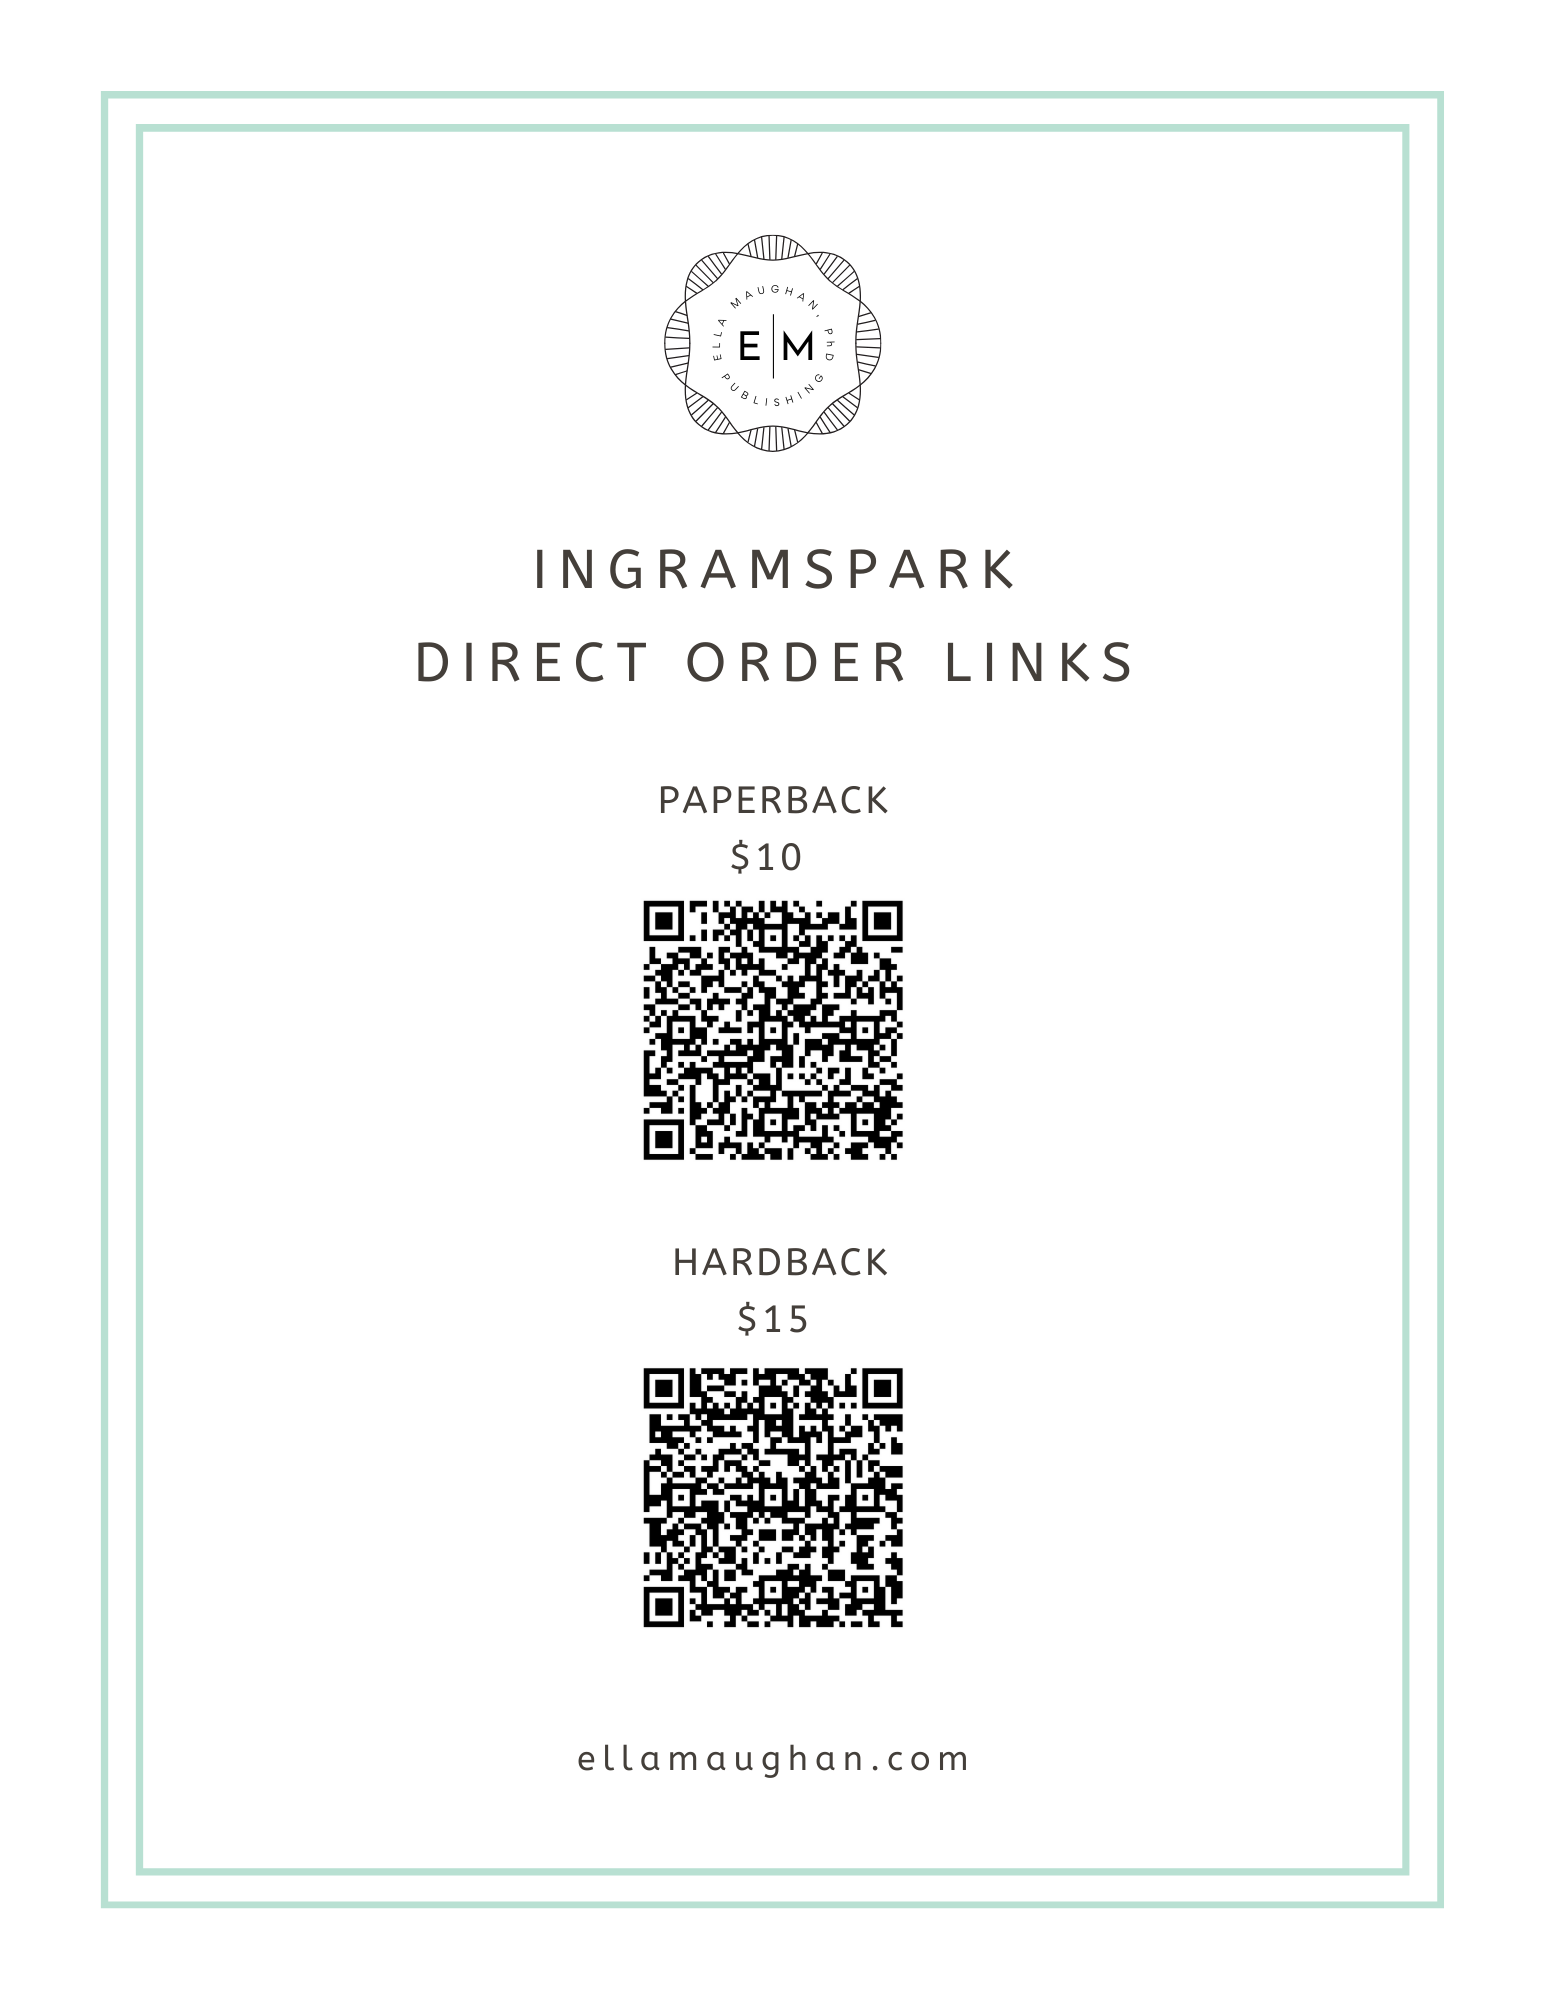
At your booth, make sure you have a price list clearly visible, so that customers can easily access key information they’re looking for, without having to ask. Make it easy for them to pay, too, by providing QR codes to payment platforms or direct order links if you’ve set these up.
A note on payment platforms: in my experience, everyone chose to pay with Venmo, but I also had Zelle and Wise links, and Square tools (contact-free payment app and a card reader)… possibly too many options in hindsight. If you’re considering using online payment platforms like these, make sure to compare fees across them. I did NOT go with PayPal because of this
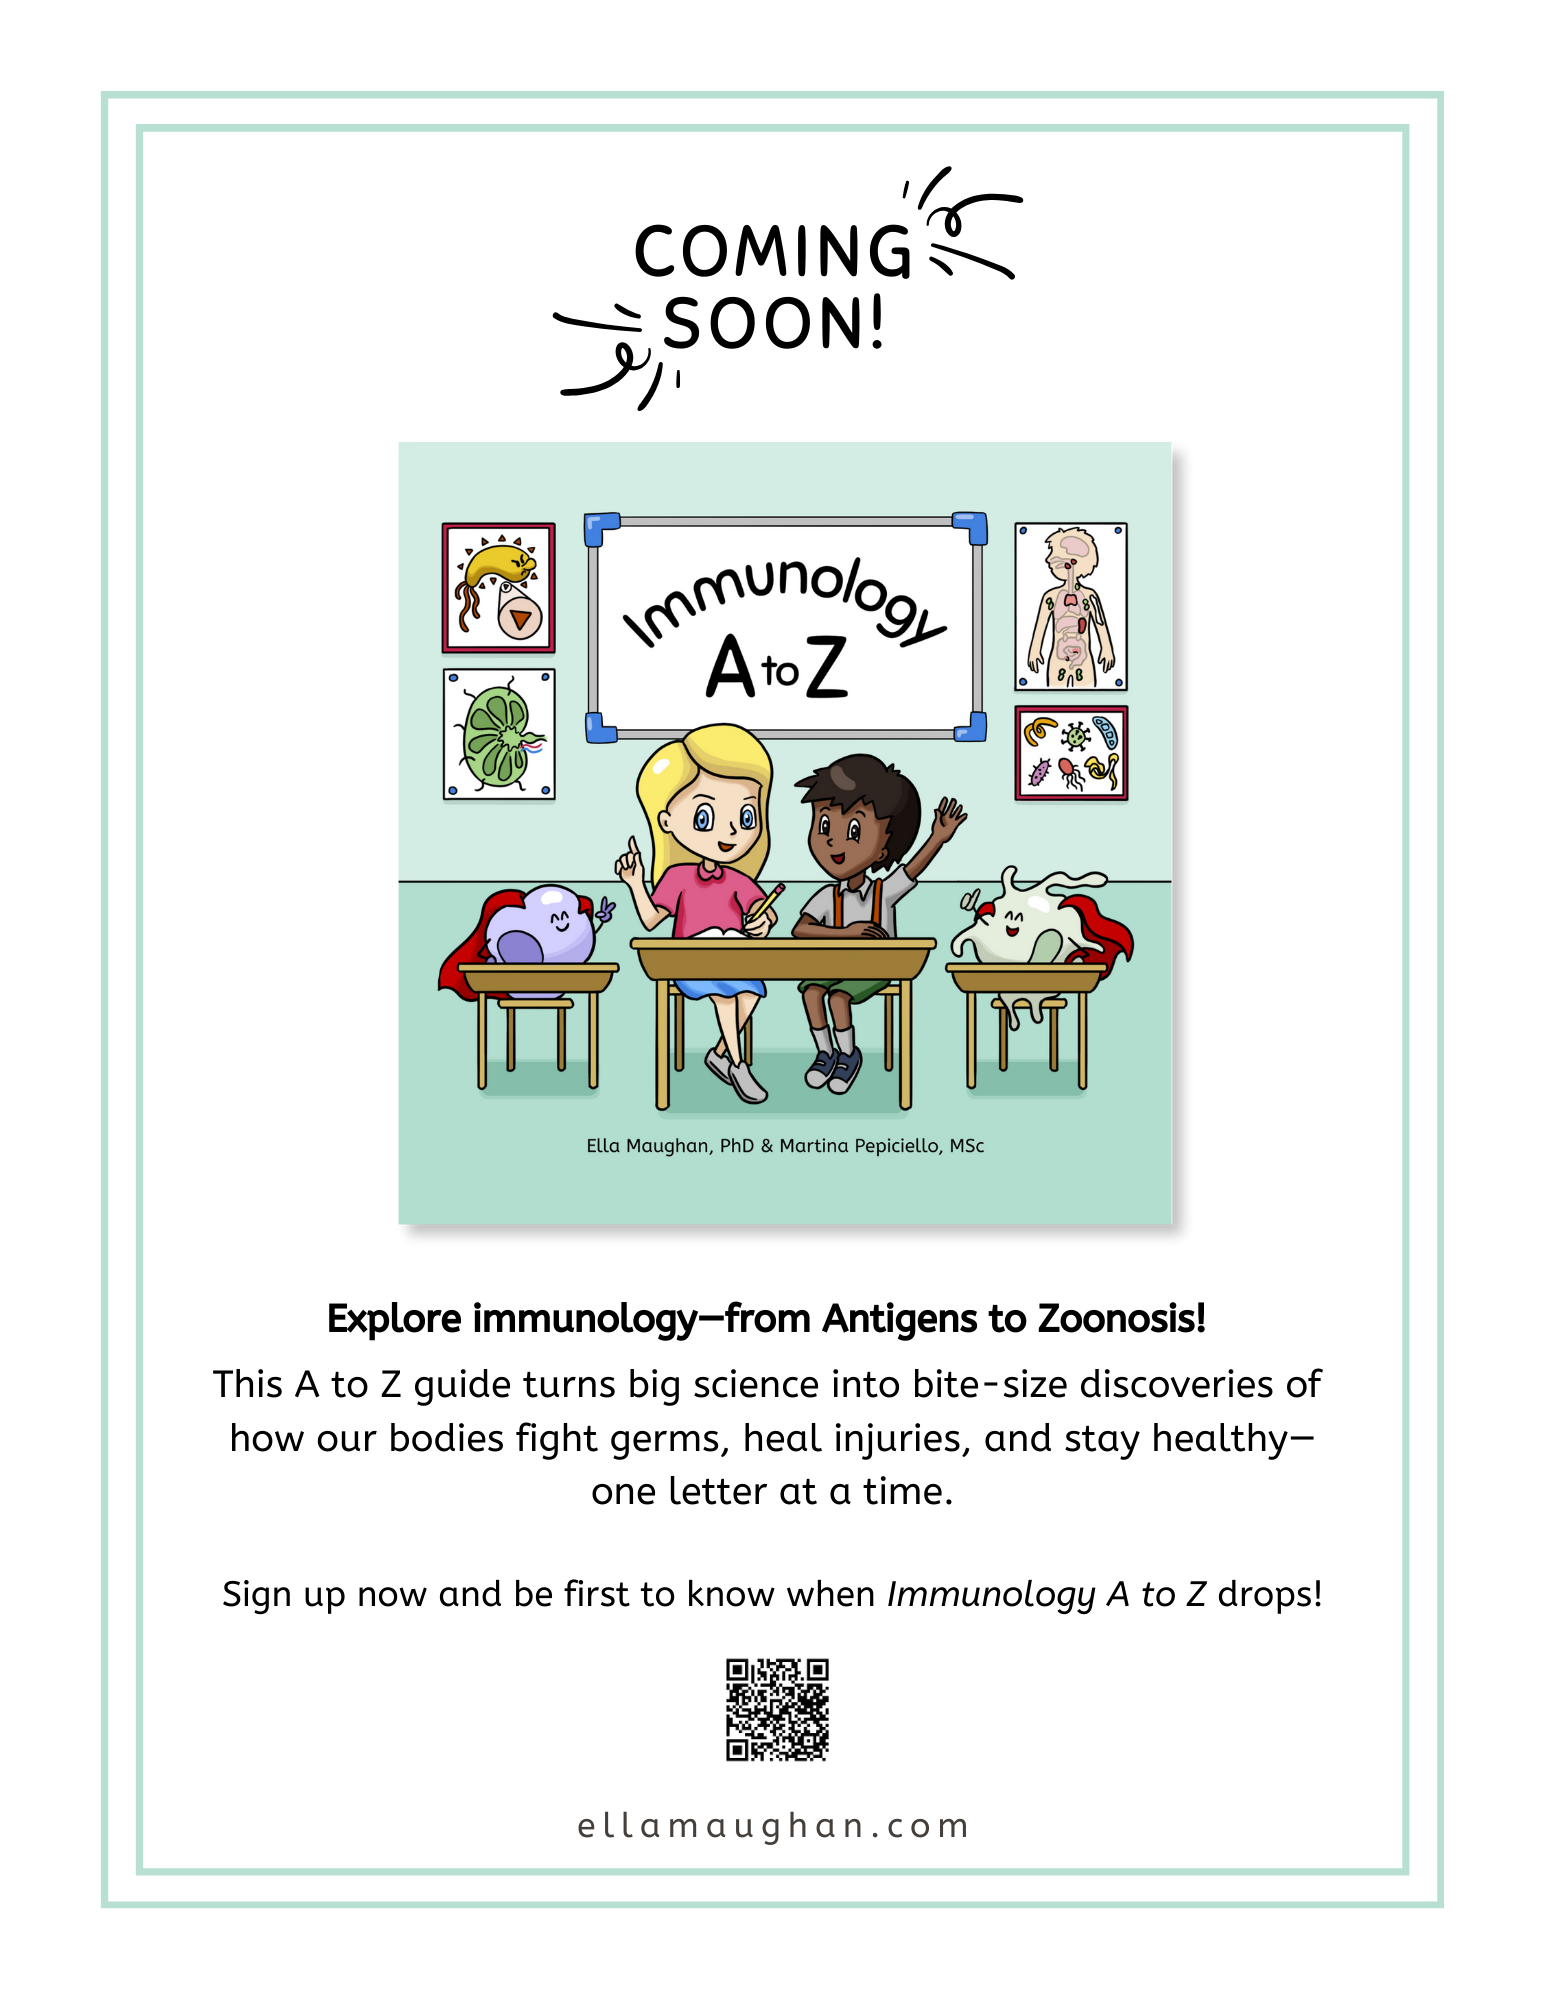
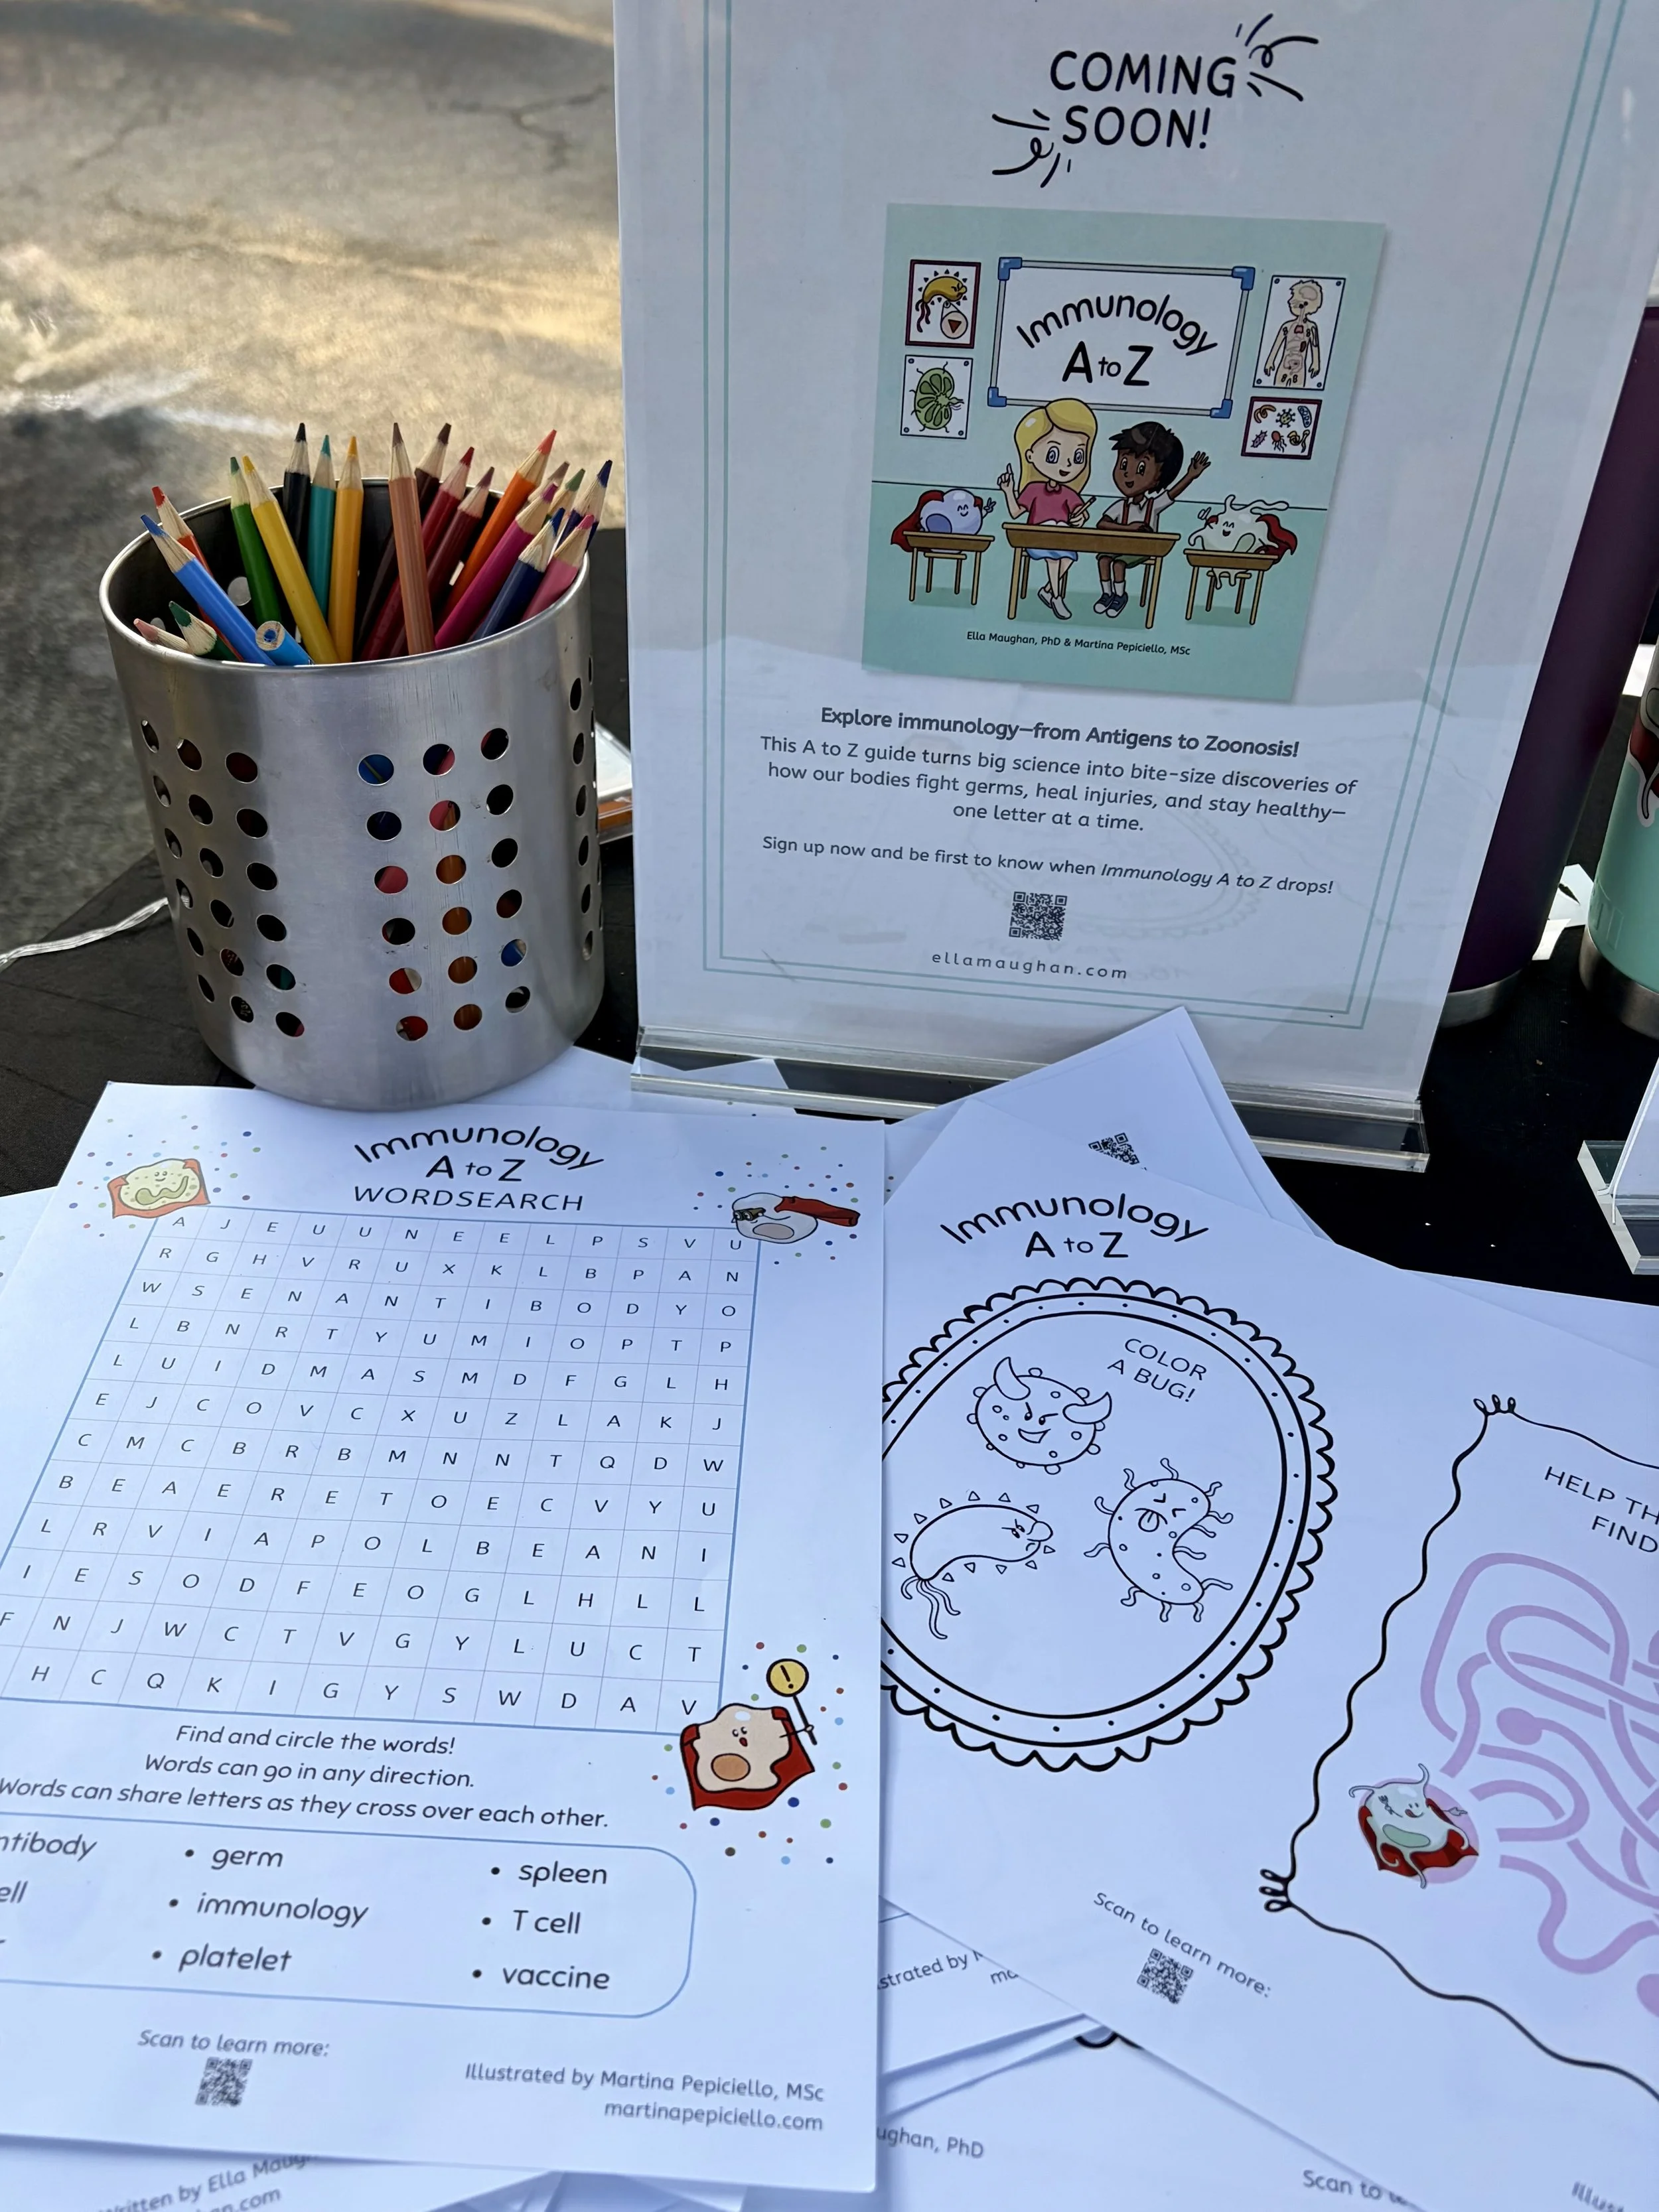
I also created a “coming soon” flyer to announce the upcoming release of my latest book, Immunology A to Z. You might also create tabletop signs that share “About the Author” information, or QR codes to sign up for your mailing list (though I quickly realized how challenging the latter is when children are your main audience).
I used acrylic stand holders to display my signs. The price list and coming soon flyer faced forward at all times, while the payment and direct order links were easily accessible by flipping the frames around!
Take a look at the booth signs below for simple design ideas that I created using Canva.
Making it pretty
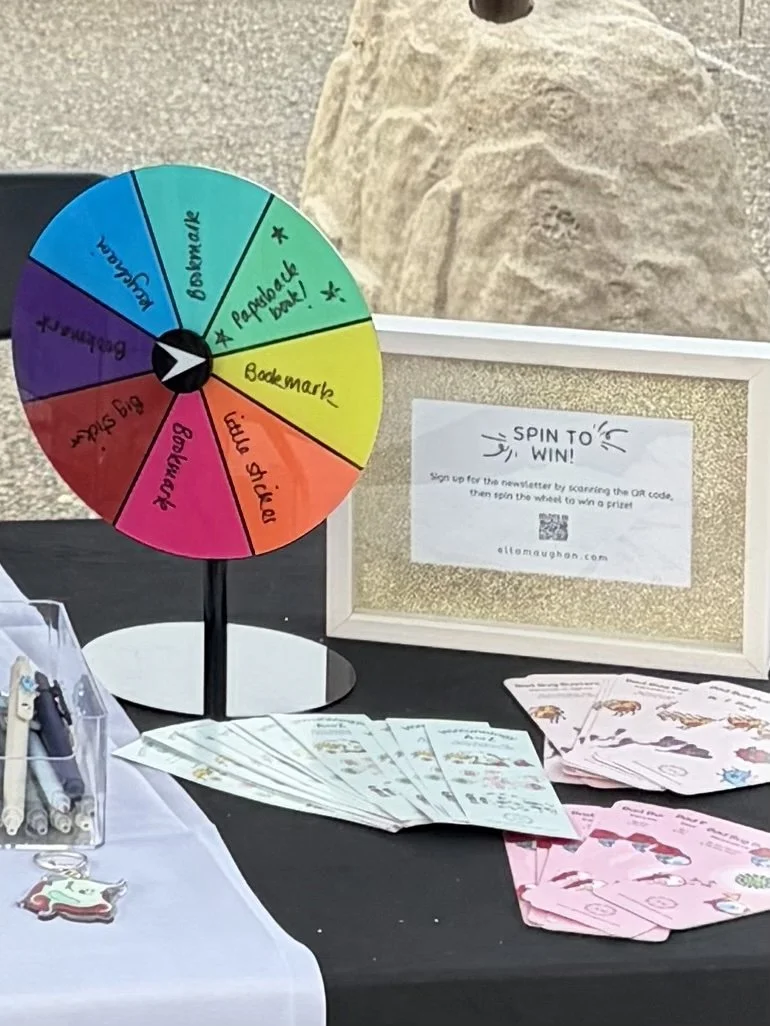
Zhuzh up your booth with book-themed and/or seasonal decorations to increase booth appeal
Add a booth draw like a free giveaway to pull people into your booth and encourage them to stay awhile
You might make this fit with your book’s theme, or the season (e.g., free candy canes around the holidays)
Mine were “spin to win” - a rainbow-colored spinning wheel that kids could spin for a chance to win a free paperback book, bookmark, sticker, pen, or keychain, and activity/coloring pages featuring key characters and themes from my books. The prize wheel was a huge hit, with many kids coming back to bring their friends for a spin
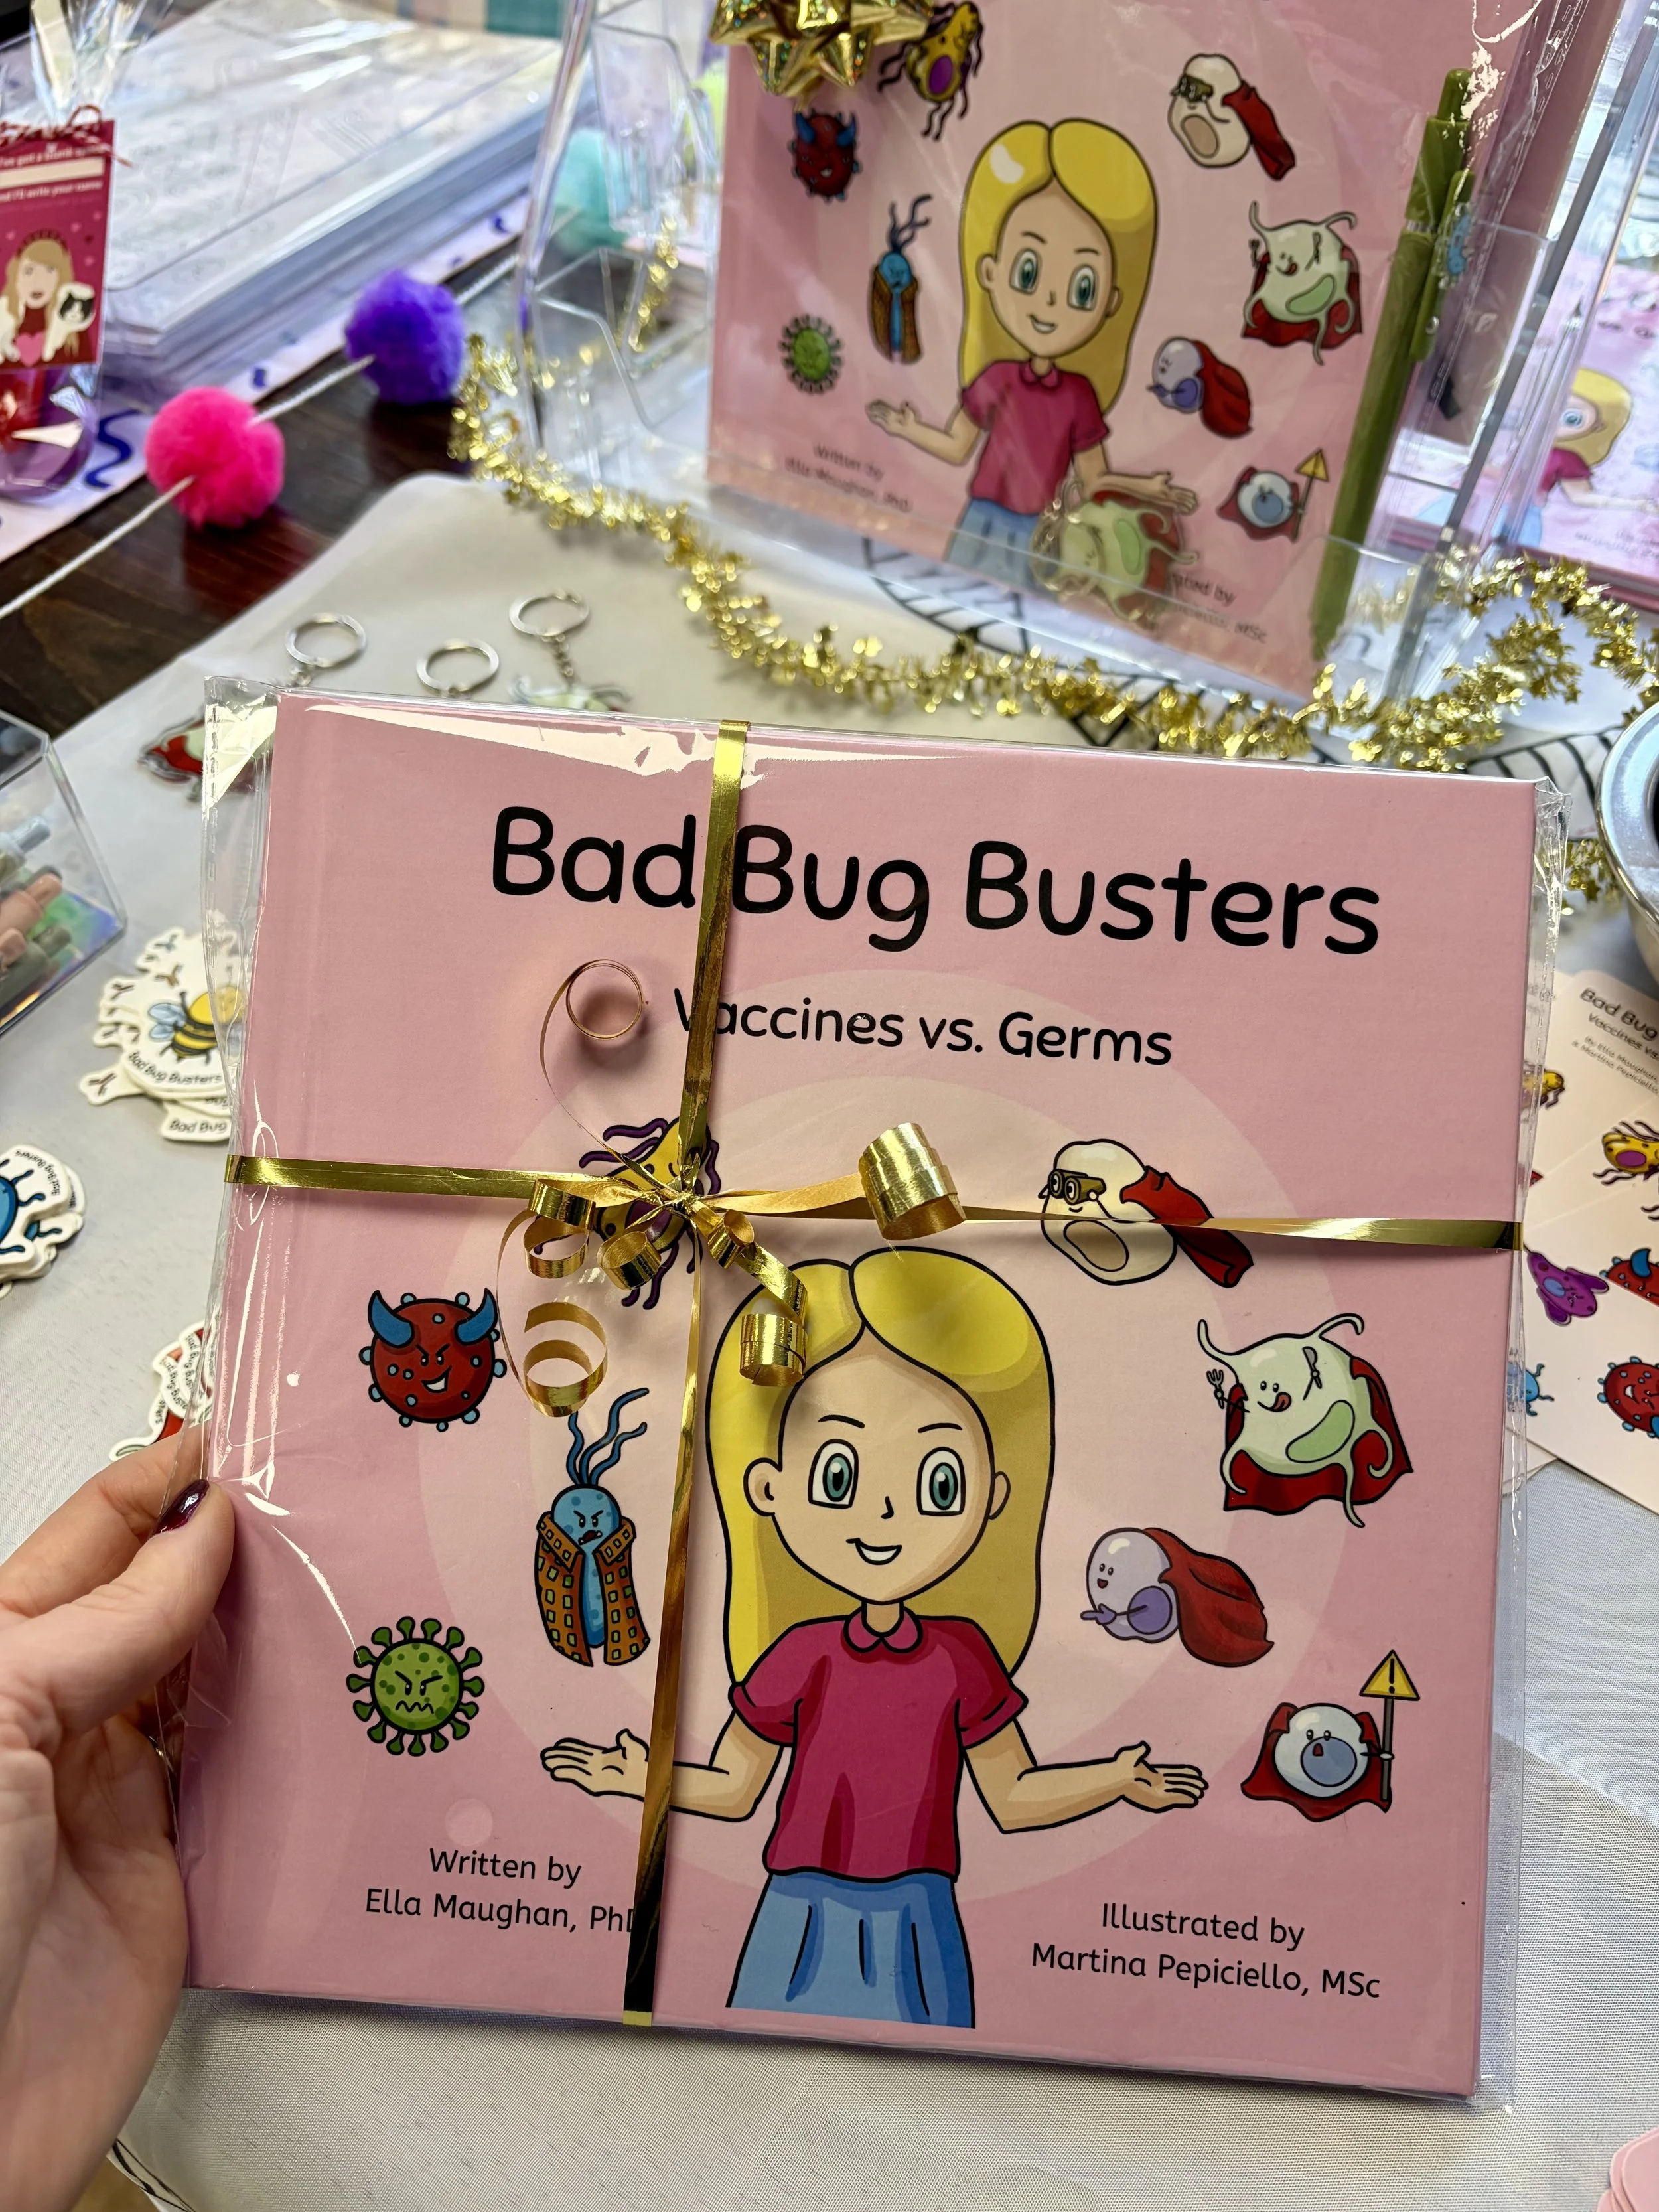
Gift wrap select books or bundles to a) raise booth and product appeal, and b) save yourself from scrambling to wrap fancily onsite
Be consistent with your branding across materials (e.g., table cloths, signage, giveaways)
Pricing and pitching your books
I’ll approach this section by reviewing key questions that came up during my preparation and research…
How many books should I bring?
Good question… that I don’t have a great answer for. The reality is that this number will vary widely depending on many factors, like the size of the event, how specific it is to your target audience, and how much you want to invest in purchasing stock. The good news is, books don’t expire, so you can always save inventory for your next event.
If you published with IngramSpark, you can also set up Direct Order links at a reduced price, in case you run out of stock. If so, congratulations!
How should I price my books for direct sale?
I’ve seen “three times the cost of printing” as a general pricing formula. I priced my books at approximately double the total cost of author copies (including printing, tax, and shipping). This way, booth visitors could buy the books at a lower price than online, and I generated higher royalties. A win-win! Something I did not think about was pricing in the vendor fees to host the booth. Using the “three times rule” would have been a more economically sound approach to factor in this cost. Ultimately, it’s up to you to decide on your target royalties and price accordingly
If you’ve published multiple books, you could also offer book bundling deals (e.g., buy two books, save $X, buy 3 get 1 free, and so on)
If you’ve created book swag (e.g., keychains, pens, character toys), you could also put together pre-wrapped ‘book + swag bundles’. These make great gift options for kids, and people always need kids' birthday gifts! I was pleasantly surprised that several people purchased Bad Bug Busters as birthday and Hanukkah gifts at my markets
What do I say?!
Practice your elevator pitch ahead of time so that you have something ready to say when people approach your booth. An elevator pitch is “a short but effective explanation that is intended to persuade someone to buy a product or accept an idea.” Think 30 seconds to a minute in length - about the time it takes to ride an elevator
If people ask about your books, you could jump right into describing your book, or start by introducing yourself, if you’re hoping to convey what makes you the ‘right’ person to be publishing on a specific topic. For me, that could be, “I’m an immunologist and have worked in medical communications for years. I wrote these books to help children understand how their bodies work, and to make them less scared of vaccines, and more active participants in their health”
I did not do this, but if you’re trying to lure people into the booth, you might start with a question or a hook… to which your book offers a solution, of course. For me, that could have been “Are your children scared of vaccines? [Introduce Bad Bug Busters].” Or “Are your kids interested in science and how the body works? [Introduce Immunology A to Z]”
Either way, live events offer great opportunities to test out your elevator pitch and see what resonates with customers and feels good to you. You can always pivot depending on which approach feels most natural to you.
Best practices
Before the event
Create to-do lists of all the things you need to buy, prepare, and bring to the market with you, and check them off the list as you complete each item to keep you on track
Check your inventory - books, freebies, etc., and place orders for anything you’re running low on
Update digital assets or tools (e.g., website content, payment, pre-order, or direct order links)
Double-check the vendor space that you will have and make sure that your tent, tables, chairs, etc, fit!
Prepare for the weather: hot or cold, rain or shine - dress and pack accessories appropriately. For me, this included thermal layers and multiple packs of hand warmers!
Pack survival supplies. Snacks, water, tissues, wipes, hand sanitizer, and weather-related supplies. Snacks are a general life rule for me - always, always, bring snacks.
Get cash out to provide change as needed
Ask if there are opportunities to do a book reading - my kids helped me read Bad Bug Busters at the Sunnyside Holiday Market and we had a great time!
During the event
Bring a friend (or find one there) who can help with setup and takedown, and cover your booth when you need a break
Give yourself time to set up - I’d say at least an hour (especially if you have a lot of materials)
Cross-marketing - when you sell a book, tuck in a free bookmark or a sticker for another of your books to promote your other products
Record your sales - I used the Notes app on my phone
After the event
Take note of what worked well and what didn’t, what inventory you have left, and learnings you’d like to apply to your next event
Share your experience on socials to continue raising brand awareness
Packing list
Check out the supply list below to see everything I prepared and packed! You can also download a free copy of the supply list by signing up for my newsletter at the link below.
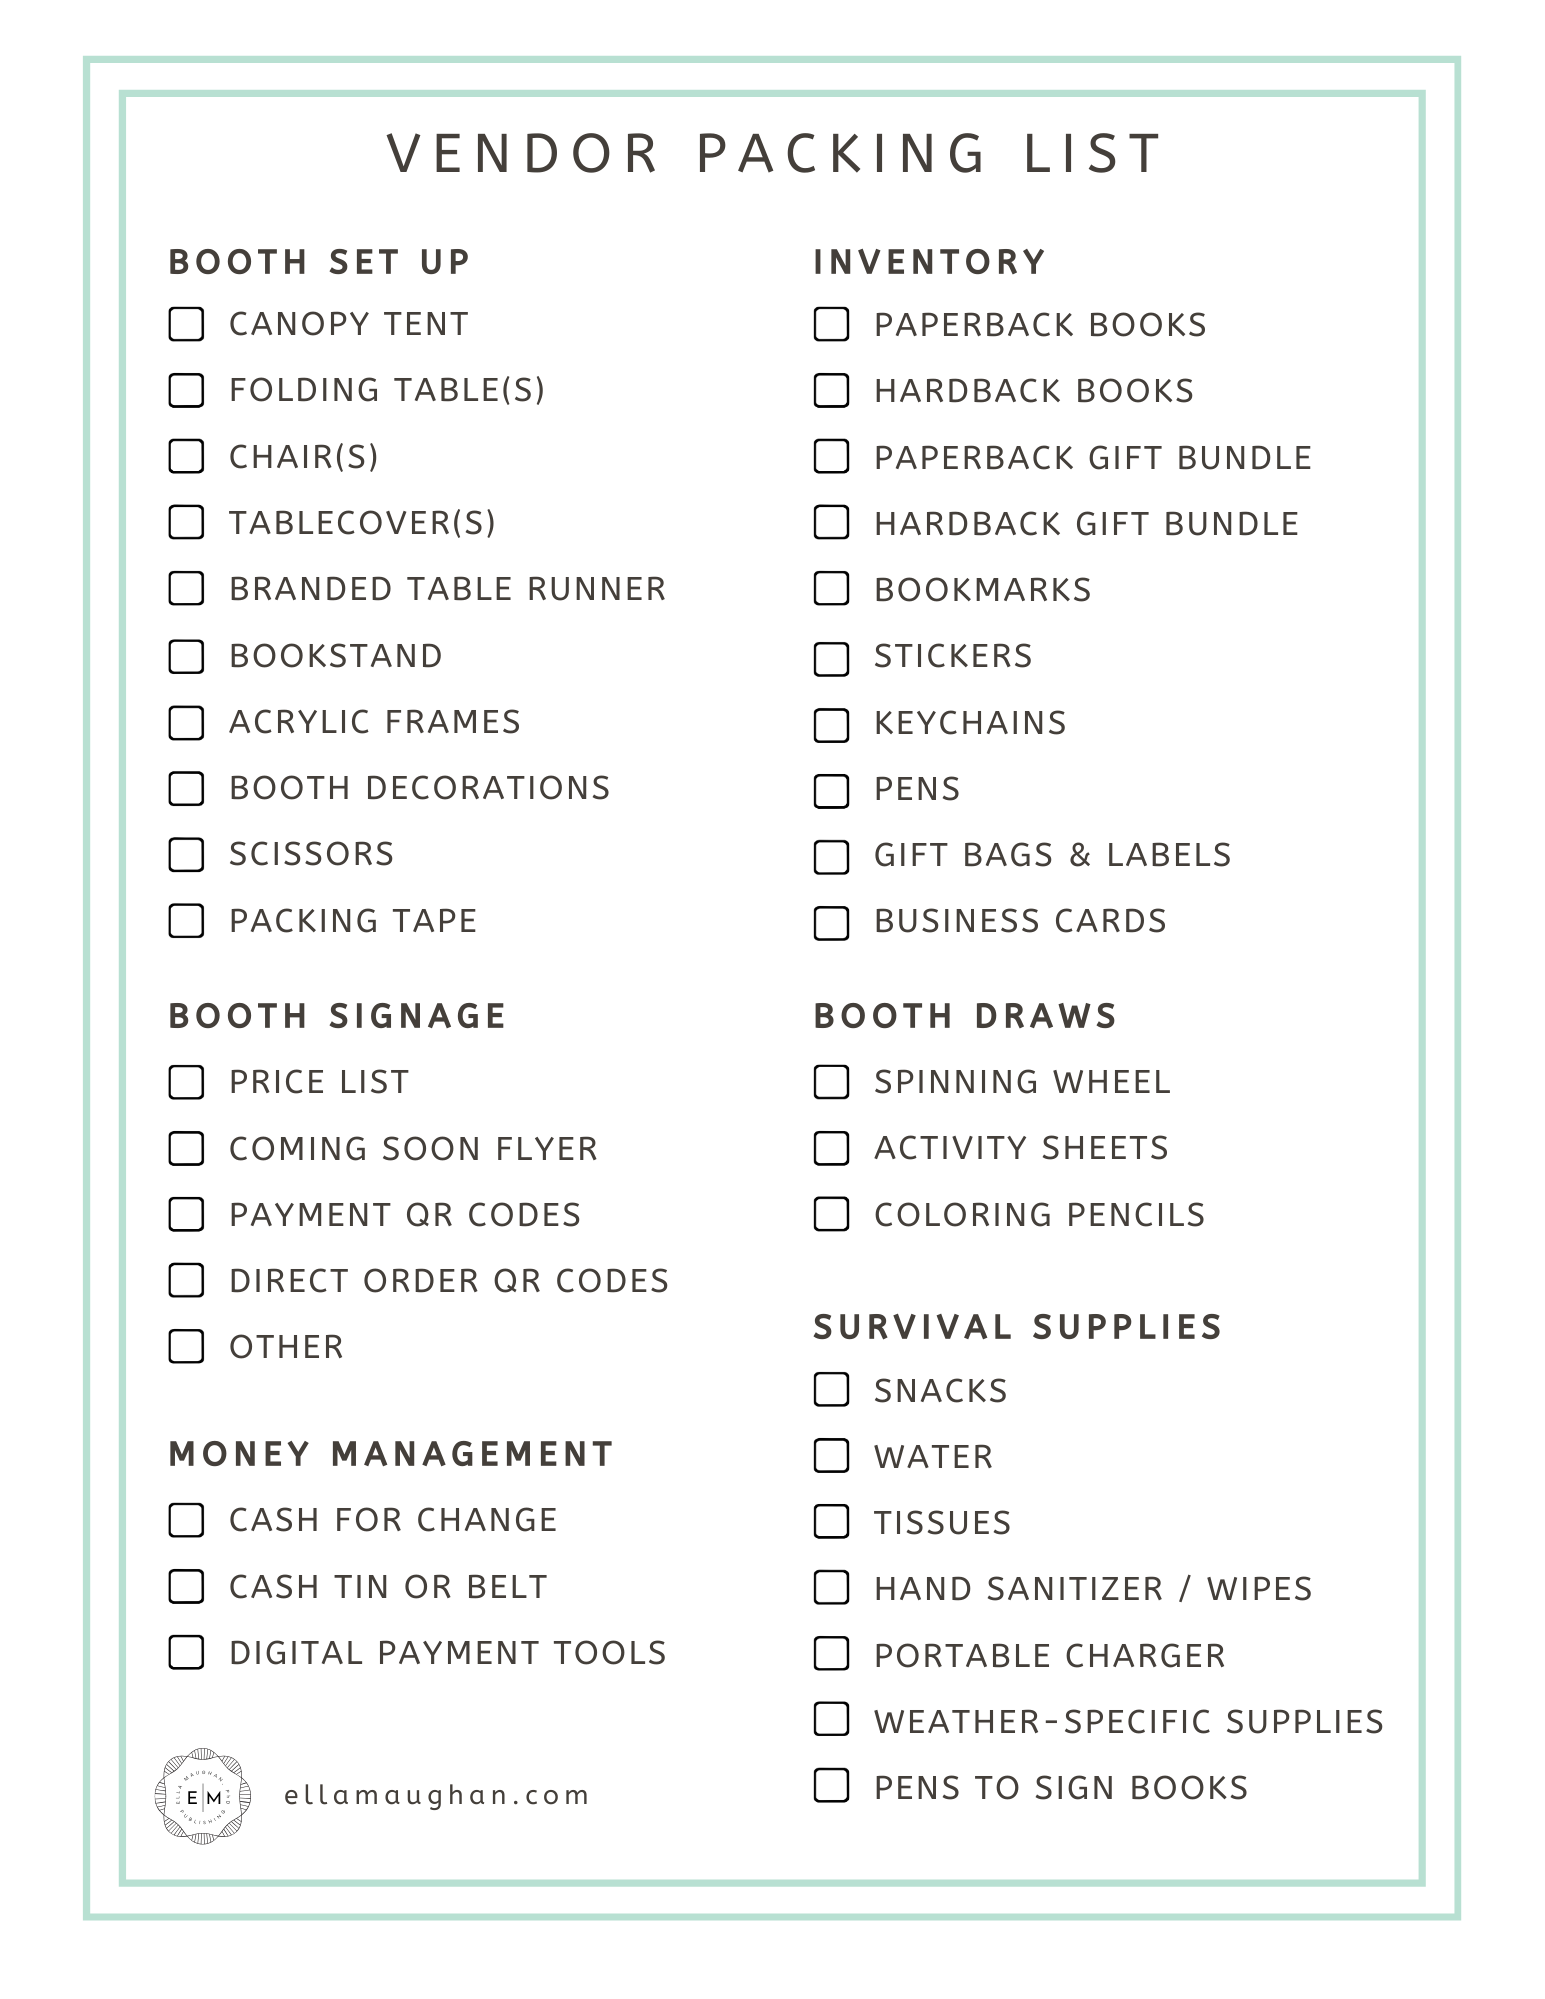
Anything you’d add to the packing list? Please comment below! I’d love to compile shared experiences in this forum to create a more comprehensive guide for fellow authors.
All in all, preparing for these markets took far more time and effort than I anticipated—but it was completely worth it. Seeing my brand and books come to life, sharing my story with a broader audience, and talking with people about the publishing process was incredibly rewarding. One of my favorite moments was watching kids light up when they won a prize from the spinning wheel. I also learned so much from the other vendors, and I feel far more confident and prepared for the next market, whatever that may be!
I hope you found a few helpful nuggets here as you prepare for your own events. Happy bookselling!